So the Jota has gone back to Scotland for fixing…again. I tried all kinds of trouble shooting to try and find the source of the noise. I disabled the clutch pushrod then disengaged the gearbox by removing the primary chains. I bump started it without the alternator and sprag, replaced the cam chain blade and finally took out the outrigger bearing behind the ignition. The whir is still there so the conclusion is either it’s coming from the oil pump or the crank itself! I could’ve taken the oil pump apart except this involved undoing the big nut on the end of the crank (the ‘Jesus’ nut). I decided this was asking for trouble so sent it to the expert.
I’m pretty dis-heartened as you might imagine. I was so made up when I first rode the bike home but now with every problem my enthusiasm wanes. The summer is almost done, if I’m lucky it might be ready for the Scottish and Belgian rallies in the first and third weekends of September.
Idle hands make the devils work…
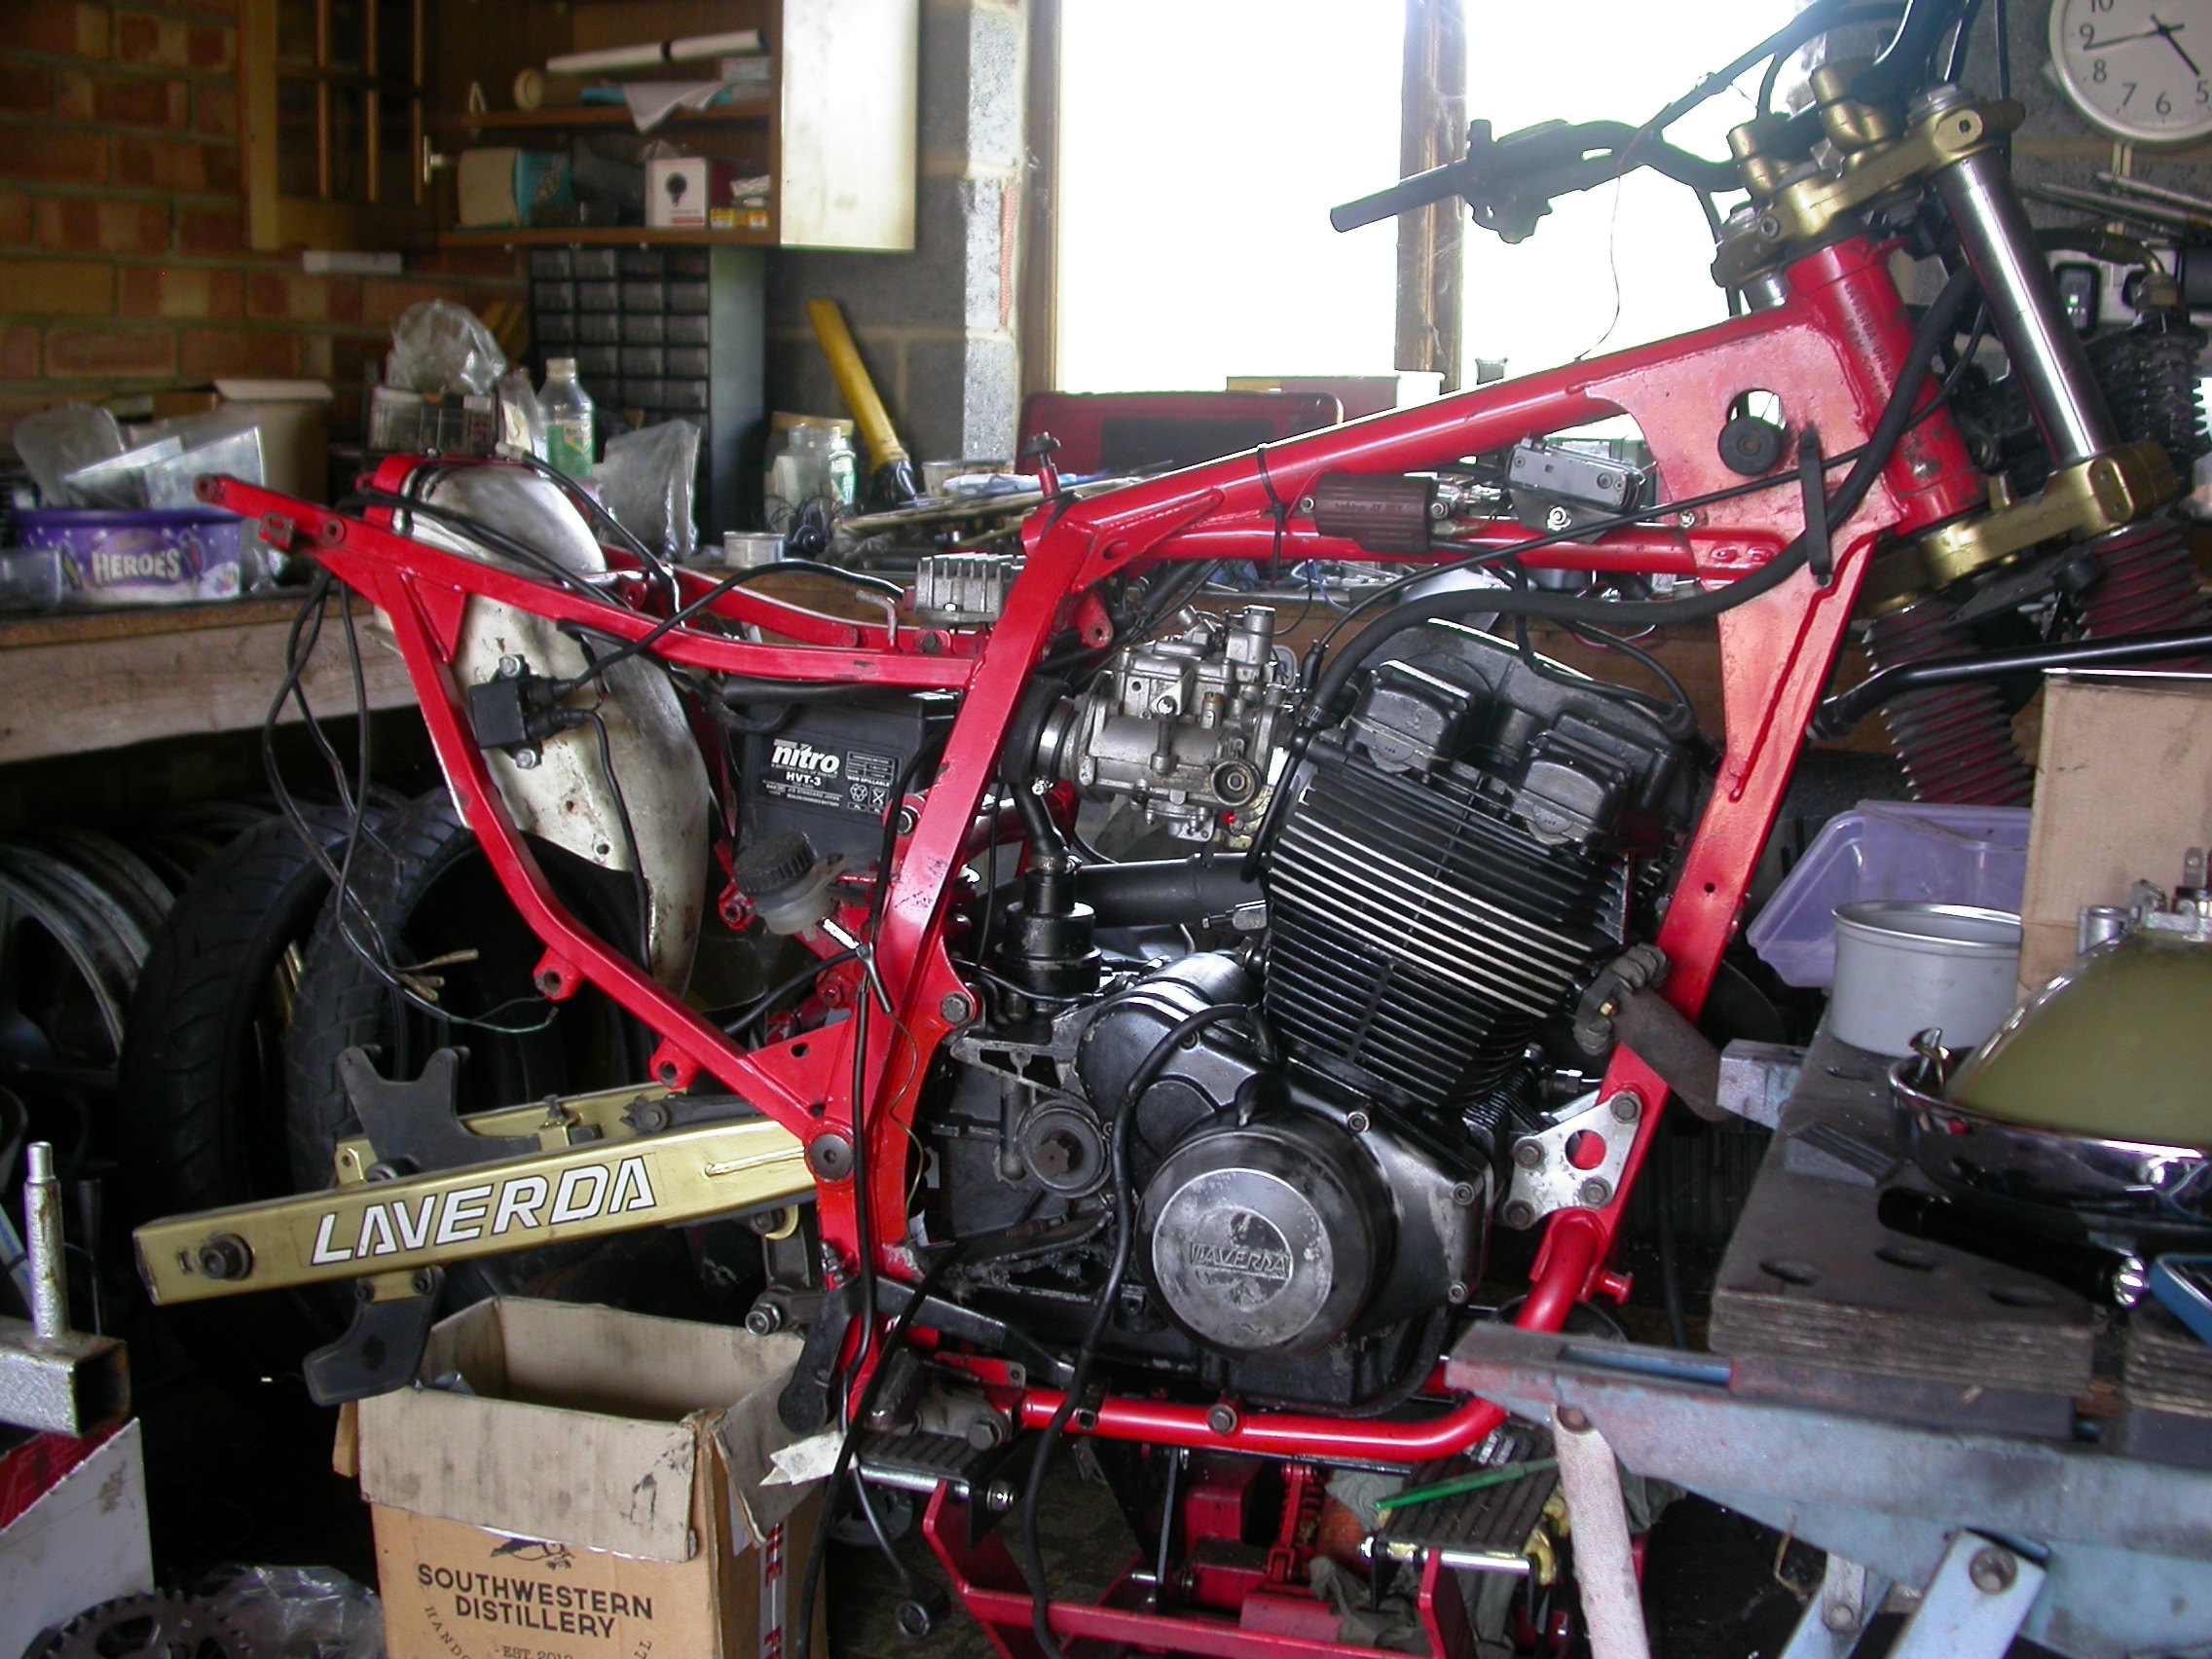
So with no enthusiasm to poke around with the Atlas still on the bike lift my attention turned to the RGA. The engine is built and under the bench. The swinging arm was in need of paint as was the frame so with all this hot weather I thought a ‘rattle can’ session was in order.
I’ve got a couple of swinging arms for the RGA as I bent one when the chain snapped many years ago and replaced it when parts weren’t so expensive. When I had the Jota rear wheel straightened I also got the swinging arm fixed. This arm is the replacement and has suffered through the many years of winter salt.
Better but could be improved…
Digging through my stash of rattle cans I found some acrylic primer and gloss black. Not sure why I had this paint though clearly I’d used it on the RGA brackets as when I applied a coat the finish didn’t crinkle (see later). The primer and paint went on well and initially looked good…however having looked at it this morning I can see that really I should have rubbed it down between coats as the ‘rust rash’ is pretty bad…
That’s better
The frame had been blasted, primed and painted with silk black many years ago. I thought the silk finish would look better but changed thinking ‘gloss’ might lift the black parts. So I started off with a good base and subsequently screwed this up by applying acrylic gloss which promptly crinkled up. I wondered if the silk was acrylic but of course didn’t do the sensible thing of trying it out on a part of the frame that is rarely seen…Still with the weather so hot it was off to Halfords for a can of ‘normal’ paint. By the time I got back some light work with emery paper and I got a couple of coats on. Looks okay I think.
So there we are – Turismo running good. Jota back at the mender, Atlas alone on the lift and yet another project re-ignited. Shambles….
So here we go again. The Jota is back in pieces after just 1200 miles. I suspect the head gasket has blown but it may be worse (knowing how my luck goes it probably is). Left the fuel on and the engine pulled a hydraulic lock. Removed the plugs and fuel sprayed out of #1 cylinder. Plugs back in and hesitantly I started it up – sounded fine. Rode a mile to get fuel but despite running okay the primary side of the engine was covered in oil 😦
At least the oil is clean hey…
I ran a compression check and the middle pot appears to be down. So it’s engine out and back to Scotland.
I’m a hog for you baby
Still I was enjoying the Jota for the short time it was running. Such a gorgeous bike to look at and listen to. Every time I parked up a bloke would come along and talk about his bike and experiences. A Laverda is a great way to meet people 🙂 Aside from the engine blow up tho’ there are various things that need sorting and I’ll use the enforced downtime to see if I can polish the stone.
Good livin’
So a ride out with Mrs A resulted in the suspension bottoming and bolts damaging the rear tyre. Now me and Mrs A are carrying a few more pounds than 30 years ago but turned out the springs were a weedy 80 Ilbs item whereas standard Laverda is 100. Robin down at Falcon Shocks sorted this while I waited so when we’re ready normal service can be resumed. I must say for solo riding 80 weight shocks worked well but I doubt I’ll be motivated to swop springs unless I know I’ll be riding alone for any length of time.
Into the Futura…
Having the downtime means I’ll also crack on with getting the standard ‘Futura’ fairing fitted. I’m undecided about the looks of this fairing but when I know there’s going to be long motorway work ahead a fairing would be an improvement. If the fairing goes on I’ll also wire up the indicators.
I’m also musing how to fit mirrors on the bike. The handlebar unit I’ve been loaned only works at low speeds – it just goes into a blur at anything over 40 mph. Orban bar end mirrors were recommended but reading reviews suggests these are more about style. I think a traditional item for when the bike is naked would be okay but with the fairing this won’t work. Laverda didn’t fit mirrors to this fairing as standard and I’m advised that adding them by mounting directly onto the fairing just means a blur fest! Thinking about this maybe a frame needs to be incorporated like the RGS or any other Jap’ bike I’ve owned. Still first up is to get the fairing mounted and then move onto the mirror issue.
Oils well
Oil coming out of the top is going to be resolved but there was also an issue with oil coming out of the bottom. I was embarrassed that my freshly repaired engine dripped oil. Initially it was thought to be coming past the copper washer under the nut holding the igition wiring. I’ve now traced it to one stud forward and installed a copper washer. I also think the primary chain adjuster bolt with its stack of washers leaks. The oil level was dropping so to be sure it’s not burning oil the exodus from the bottom of the engine needs fixing!
All alone
So now the clock is ticking for the LCF rally in Les Vosges toward the end of June. Hopefully the Jota will be back and road hardened. If not then I need to see if I can develop a Plan B. A fresh starter motor means the Atlas engine spins over so I have to see if it will run. I don’t hold much hope for this engine as last time it didn’t seem in good health but hey leave an engine alone for long enough and it’s sure to fix itself hey!
So after months of messing about I finally decided to get Atlas #3 going. Many, many, many months ago it started misfiring on the nearside cylinder. First of all I had a drama with one of the exhaust valve clearances leading to a broken head stud and many nights trying to tighten things up without jamming the cam. I planned to sort out the alternator wires (work in progress so borrowed the alternator off Atlas #2) and tried to fix a broken gearbox return spring.
So finally it’s ready to fire up and damn it is still refusing to start on the nearside cylinder and it’s still banging away. Checked the spark which is good so decided to swop out the carb’. New carb’ (off Atlas #1) gives me nothing so out with the carb’ cleaner and go through the original which seems to be working well. So back cranking the motor over and it starts on the offside cylinder. I run it for a short while before I notice smoke on the exhaust – that’ll be the smoke out of the exhaust port then…bugger it’s messed up and will need the head off.
Knackered gear return spring
A bit of good news is that I replaced the broken gear return spring. I couldn’t face some weird Brexit fiasco so contacted Alberta Springs, Colchester UK (01473 311783) and had them knock up 10 replicas for £65. I’m pleased with the result (although annoyingly found a pristine spring when rummaging for something else) and now have a box of spares! You can see this spring is already showing signs of failing with the lower coil distorted. Let’s see if this UK replacement is a bit stronger (assuming I get a damned Atlas to run).
Replacement alternator grommet
The other replacement part I sourced was the alternator grommet. The original was perished but I suspected replacement would be difficult. A bit of www time threw up the idea of a grommet off a Honda CD200. Dave Silver sold me five for just under a tenner and with a bit of trimming these’ll work.
Back on two feet
Not much progress on the Jota, although it is now off the floor and on its centre stand.
Ral 2010 Orange peel…
The front mudguard however has been sprayed after quite a long time being filled, sanded and filled again. Quite a monotonous process but quite satisfying when the paint goes on. As with most of my projects I found it difficult to stay interested enough to do a really good job but even so it’s not bad. I put a few coats on and rubbed back in between. Mrs A managed to put a thumb print in the finish as due to the cold weather it has taken an age to harden up. The result is okay and this despite not having a session of T-Cut to reduce the ‘orange peel’. When it is a bit warmer I plan to do a final cut and apply the clear coat and that will do.
Cracking
So with covid lockdown lifted on the 12th April I was off down to Motoliner to retrieve my busted wheel and drop off another. The wheel that failed whilst being straightened is a hell of a mess. That’s one serious crack hey?
Wonky wheel – try saying that after a few drinks!
You can see that the replacement wheel I dropped off for straightening needs quite some work! Motoliner are more optimistic about this wheel as the dent is not by a spoke. Thing is the wheel is 40 odd years old so fingers crossed it works this time round. If this fails then I’ll either fall back on the original wheel which looks straight but it well used with cracked powder coating with worn bearing housings that require assembly glue…not ideal. Failing this I happen to also have some wire SFC 1000 wheels though I understand these need modifications to fit…
Bent
One of the modifications to fit SFC wires is the use of an RGS swinging arm. As luck would have it I have a spare in the loft…but this was bent many years ago when the chain snapped on my RGA. Like all of us I never throw anything away and now in 2021 its off to Motoliner to be put right. The picture shows how the broken chain bent it. It didn’t come to light until I pulled the back wheel out and the ends ‘sprang’ inwards. With the cost of swinging arms these days its cost effective to repair rather than replace.
So as lockdown loosens its grip and summer is starting to shine through I find myself with just the little Turismo to go ‘Laverdaring’ on. I think really the focus has to shift squarely behind the Jota as someone else built the engine and all that’s left is for me to screw together the running gear and electrics. What could possibly go wrong?
So I signed off saying that the clutch centre nut wouldn’t move. An internet search revealed that back in 2014 I asked the Paul LeClair Forum if this was a left hand thread and Tom Eatman confirmed it is. So armed with this information I was far more confident with the big hammer… I tried to hold the clutch locking tool I’d made up without success so eventually came up with wedging an axle stand up it, sitting on the bike to apply pressure and the 30mm nut gave way 🙂
Clutch locking tool Mk 2
With the old clutch off I was expecting to simply replace the light scissor spring – I have quite a few spare ones. Unfortunately it turned out to be the heavier spring that you can just see in the top right of this picture. So no point contacting OCT for a €20 spring post Brexit so next step was to ‘rob Peter to pay Paul’ and set to my spare engine. The engine is on a bench and I didn’t want the hassle of getting it down etc so after a couple of attempts with the locking tool I had a brainwave and used the slot in the handle and locked the clutch using the crankshaft. Worked a treat 🙂
So I could’ve just used the spring off the spare engine but I decided to see if I could find an alternative replacement. It seemed impossible to get a spring based on dimensions so I just looked at a selection of images. An early Kawasaki Z1 (Z1/Z1A/Z1B 92083-021P) had the same three coil spring so I gambled my £13.05.
Kawasaki spring bodge…
The spring looks okay except that the ID is larger. I looked at this and figured this wasn’t a big deal – the spring would end up a bit compromised but probably work. What I needed was a spacer to go inside the spring to pack it out. The solution turned out to be a large cable tie that I cut down and sleeved the gearchange shaft. I’ve installed the Kawasaki spring – could’ve put a Laverda one in but I want to see if my bodge works 🙂
Corrosion insurance
So to button up the primary case and remembering the pain in the arse problem the bike seems to have developed with allen bolts sticking in the cases I’ve added a copper washer along with copperslip to each bolt. Hopefully when I have to dismantle the bike next time (probably to replace the Kawasaki spring…) it won’t prove so much hassle.
Genuine petrol cap
Finally my waiting game paid off and I stumbled across the original Jota petrol cap 🙂 It’s not very shiny but it won’t jam like the rubbish I got off ebay. Must get back to the Jota project…
So life gets in the way. Struggling to make progress on the bikes in the midst of other pressures on my time. The situation will improve but at the moment it’s all I can do to grab an hour here and there.
The consequences of Brexit are beginning to reveal themselves as sourcing parts just became more difficult and more expensive. The parts are all there but exporting to the UK has become a major pain in the ass and some European suppliers are thinking this is more hassle than it’s worth (and this’ll also become the case with ebay trade). It’s more expensive because of import duties, customs handling charges and bigger credit card conversion costs. Hopefully this’ll all settle down and new ways will be found but at the moment running a Laverda just became more difficult.
V5 (C)
I’ve known for a long time that the paperwork for the Jota isn’t up-to-date because back in the day I never updated the registration from a V5 to a V5(c). The consequence of this is that I could’ve lost the original registration number which would have been a pity but maybe more of concern was having to go through a long re-registration process. I finally got it together and checked the registration hadn’t been re-allocated from which it was a simple process of £25 to get the V5(c). Now I have the right paperwork I have to change the owner from Mrs A to me…a legacy of some insurance ‘fancy footwork’ when I bought the Jota back in ’87. You can try and outrun ‘the man’ but he always catches you in the end…
I’ve been using this time to sort through my garage loft. This activity has revealed a lot of parts I’d forgotten I have and also cleared space. I’m not only getting loft space but floor space too as I’ve sent a few bikes off to hibernate elsewhere. I’ve been bringing parts down for the Jota – though I still can’t find the original fuel tank cap. I know I have it but at moment it’s still in hiding!
Pile of bits
Aside from the petrol tank cap the parts are almost all there. There’s an ongoing issue with the wheels as covid is preventing me getting a rear to match the front. Funny enough the garage tidy revealed another thick web front that I had forgotten I had. This’ll be pressed in to service as the current front has a luxurious coat of powder coat which is slightly too dark.
The other ‘new’ item is the front mudguard which I’ve stripped to bare metal. This had the typical crack in the nose and maybe 10 years ago I got a fellow Laverdisti to repair it by welding in some plates from a crashed 120 Jota. The mudguard had a layer of filler all over and I wondered if this hid some mega dents but not so. It’ll need a little help here and there but nothing major.
Underside of mudguard with a strengthen plate in the ‘nose’
Finally I decided it was time to return to Atlas #3 which has started and just needs tidying to make it ready for spring. The small gearbox return spring was broken (again) last time I rode it. This little spring is such a pain in the arse to change as you have to remove the clutch. You can still change gear by preloading the gearchange (gentle tap on the lever) so I must have ridden a few thousand miles like this rather than sort it out.
All this to change a stupid spring…
I started off in a reasonable frame of mind but this changed as I worked on… Last time I put the primary case on I was meticulous in coating the allen bolts with copperslip. Despite this some bolts still needed persuading with an impact driver to release. I’m going to ensure the primary case is real clean before it goes back together and I’m going to place a copper washer under each bolt to try and get on top of this corrosion which makes a simple task irritating. Next up the clutch centre nut won’t budge. I have a clutch locking tool and applied heat but no deal. I could feel the accumulated stress building up and decided to walk away before something got broken. It can wait another day/week/month/year…
So I looked back and saw my last entry started with ‘where does the time go’ or somesuch and here we are again with months gone by and nothing to say!
I could blame covid-19 or other matters but truth be told I’d lost my way a bit – maybe overwhelmed by the mountain of unfinished projects calling for my attention.
Still things changed when this lump dropped on the garage floor! The freshly built engine from my first Laverda, a 1981 Series 2 Jota. When I took off the packing I had to check with the engineer whether he’d painted it – a rather disparaging reply informed me that this is what a clean engine looks like…
I’d never done proper engine work on the Jota. I’d always given it to a professional so all the bad stuff ain’t down to me. The crank had been messed up by another professional so it all fell to the latest to sort out everyone else’s folly. The report back was that there were 15 threads/studs that were knackered so bad alloy plugs had to be welded in and redrilled! It’s got all the stuff you’d want – rebuilt crank with new rods, new pistons and a sorted head with new camblocks. More importantly to the engine got what it deserved after surviving 125,000 miles in my hands – a professional rebuild.
Ohhhhhh Mikuni’s
Along with the rebuilt motor came a set of Mikuni Flatslides. I opted for these are the cylinder head had been taken out many years ago to 35mm which had resulted in loss of torque (fine for a racer but not the road) The Mikuni installation means the chokes go back to 32mm (along with smaller valves) which ought to find that torque. The other reason for this change is the original carbs are now 35+ years old and in the absence of new Dellorto’s I didn’t fancy messing with the engine’s running by slapping crap carbs on.
Bent rim
So I started running about looking through my box marked ‘Jota’ and remembered many years ago that the rear wheel got replaced and powder coated (a mistake as it’s only gonna get chipped…) only for me to see a ding in the rim when I got it home. So the rim got rushed over to Motoliner who think they can fix it without ruining the finish. All turned out well because along the way I met a chap with an RGS with dinged rims who lives close by – so loaded these up too and delivered a job lot.
The chap at Motoliner put the wheel on his rig and confirmed the rim was dinged where I indicated and then showed me three other places where it was out of true!
So next step is to get the engine back in the frame. I plan to lay the engine on its side and put the frame around it to avoid chipping the finish. Covid restrictions lift next week so let’s see what we can do soon…
Ignition box holder
Last time out the Atlas had started and then I kind of stalled (sic). When I was using the bikes every day for work it would have been back on the road months ago but now it’s not necessary I dithered and found work. That’s not entirely true because I did need to tidy up the wiring and in doing so needed to make a proper bracket to hold the Sachse ignition box. I’d previously tied bubble wrap round the box and stuffed some packing case foam in the frame hole and effectively wedged it in place! The problem was wires would come loose on a reasonably regular basis leading to a tank off situation at the side of the road. No big deal but not what you want is it?
Template
This time round I sort of did a ‘proper job’ in that I sketched out a cardboard template and used this to cut up an old metal oven tray Mrs A had given me. The metal is a bit thin (made it easy to bend) so I’m not sure how long it’ll last but I’ve proved the concept 🙂
Nasty
So of course you know how it is, once you’ve got into your wiring you can’t stop yourself looking. If you look enough you’re bound to find trouble and I couldn’t resist removing the cracked sheathing on the alternator output wiring. Infact looking at this and the leaking bung that tries to keep the oil in the casing it’s pretty clear that the engine needs it’s pistons checking as the engine must be getting compressed by air going past the rings. Still these alternator wires need ‘restoring’ so that’s maybe the next Atlas task.
Not all the new stuff in the garage is for the Jota. In between times I got this new Hagon shock. Hagon no longer repair my old shock model so did a deal on this new version. Looks neat and I’m wondering if I ought to fit it to Atlas 3 as this is the bike most likely to take a pillion.
While I’m on the subject of suspension I’ve noticed the huge improvement in the rear end since I replaced all the suspension bushes. Now if I push on the rear end it moves – if anything it feels soft! When I remember how solid it was and how it stuck taking out maybe an inch of travel I’m looking forward to some good old ‘Soft Ramble’ in the not too distant future!
Deep heat
So the final bit of work was to the Atlas rear fairing. I took some time to realise I was trying to fit the wrong silencer (off Atlas #1) but once I sussed this the correct silencer went on fine. This then made me look at the melted rear fairing caused by it fouling the silencer. The plastic panel is rubbish and not a great fit but I didn’t want to keep melting the sucker. So first off I jammed a broom handle between the silencer and panel to ‘encourage’ it to bend upwards and away and then later decided to ‘really encourage’ it with a butane rattle can (Mrs A doesn’t have a hairdryer) 🙂 I think I showed remarkable restraint in just warming the panel. It’s moved a bit but I’ve left it with the broom handle back in place and may go back for a second crack…
So some progress to report and hopefully I’m back in the garage again…
Note original Motoplat brown ignition coil (rubbish apparently)
Where does the time go?
Finally got back down the garage and put oil in Atlas #3 ready to have a go at starting it. I’ve been trickle charging the battery on and off and with two green lights on the Optimate time to rig up the fuel bottle and give it a go. The battery is a bit ‘secondhand’ as fully charged it’s giving 12.98 volts, a new one is over 13.
Anyways pressed the button and got a ‘click’ from the starter solenoid and that was it. A quick inspection showed the lead from the solenoid wasn’t attached to the starter…
Second attempt resulted in a spark near the engine mount by the exhaust collector and a blown fuse. Not sure why that happened but suspected that maybe the engine earth strap was shorting on the frame. Made sure the strap didn’t touch the frame (levered it with a screw driver…) and replaced the fuse but no power? Checked continuity on the earth strap and suspected poor contact on the engine which was fixed with a little emery paper work 🙂
Third attempt the engine spun over and backfired through the carb’ so I swopped plug leads over thinking maybe there were round the wrong way – more occasional backfiring so plugs out to check the spark. How many times have I done this in my life…
The blue wire in the ignition box should go to the outside terminal…
Left plug won’t spark so take off the plug cap and try and get a spark from just the HT lead – no joy. Swop coil wires about until I get the left to spark but not the right. A bit of head scratching until I wonder if the wires to the ignition box are correct. Lucky there’s a schematic on the box and sure enough the blue wire is where the black wire should be – two sparks 🙂
Inspecting the plugs made me wonder if fuel was getting through as they didn’t seem wet but anyway decided to give it another go. A few attempts and a fiddle with the choke and the unsilenced motor burst in to life. Sounded sweet – well to me but I’m not sure the neighbours would agree!
Ready for the road
So with the engine running ‘all’ that’s left is to fit the air filter tubes, sort out the rear brake master cylinder mounting, fit the silencer and body work and tidy up the wiring…oh and remove the clutch and replace the gear return spring and fit a clutch cable…oh yes and finally replace the alternator output cable sheathing and connect up the rectifier. Should be simple…
So Atlas #3 is ready to be fired up once the oil is in. Despite its rather desperate appearance everything that needs to be connected up is. As you can see the bike now sports a Mk 3 exhaust system (albeit one with a flat in the primary pipe from an accident many moons ago). I put this on because I know I will need to do more work on the alternator case (paint and replacing the wiring sheathing) so for now it’s easier to go the Mk 3 route. I dug out a replacement Mk 1 link pipe but wonder if I will go back to this as having an exhaust passing under the carb’ seems a bit dangerous.
Atlas #1 is not too far behind and recently got its new foam air filters. The offside one is slightly compromised by the air intake bracket but I’ll live with that rather than chopping up an original part!
Rubber original on the left
Don’t worry these were cleaned before fitting…
Fitting the alloy inlet manifolds as opposed to the original rubber items helps fitment of the foam filters because you don’t then need the bracket to support the carb’ to the frame. It’s a shame that these manifolds are no longer available as the rubber originals are all now 30+ years old and showing their age with cracks.
The foam filters pass just inside the frame but I might experiment with some radiator hose to see if I can move them back an inch as I suspect rain may get in via the frame touching the foam. Thing is to get the bike running and then work out these details.
In addition to the foam filters I also replaced the diaphram spring. I’ve lost one of these which is why I got another. I was surprised to see how much the used spring has compressed with use.
I also fitted the long pilot jets which are no longer available. I’ve run these before and found no discernible benefit though on sports cars they are supposed to handle fuel surge under hard cornering.
Atlas #1 is therefore well on the way to being ready to start. So why no announcement that either bike is finally running? Well there’s no hurry and I kinda felt in a bad mood as I twirled the spanners. There’s a little amount of fiddling to do that requires a clear head – many times I’ve got so close only to bugger things up by rushing. So watch this space for next week’s big announcement…
So Atlas #1 is taking shape at last. The swinging arm is in along with the rear suspension. Alternator rotor, starter sprag and starter motor in place. Oil cooler also positioned.
The swinging arm and suspension linkage with all new bearings slide in easily.
A Mk 3 Atlas should have twin oil coolers but I’ve decided to install just one. One oil cooler is plenty (it doesn’t really need one for the UK weather) and has the advantage of not getting damaged in the event of an accident – both times I’ve slid up the road the left hand oil cooler has been damaged.
The roller on the right is the polished one…really?
The starter sprag is a Zimmerman unit with oversized rollers. The rollers are made out of silver steel bar that has been hardened. Before the bearings went in I polished them with a Dremmel to give a better fit with the ring gear. I’m hoping this arrangement will work for longer as the last time I used this sprag the unhardened rollers wore pretty quickly.
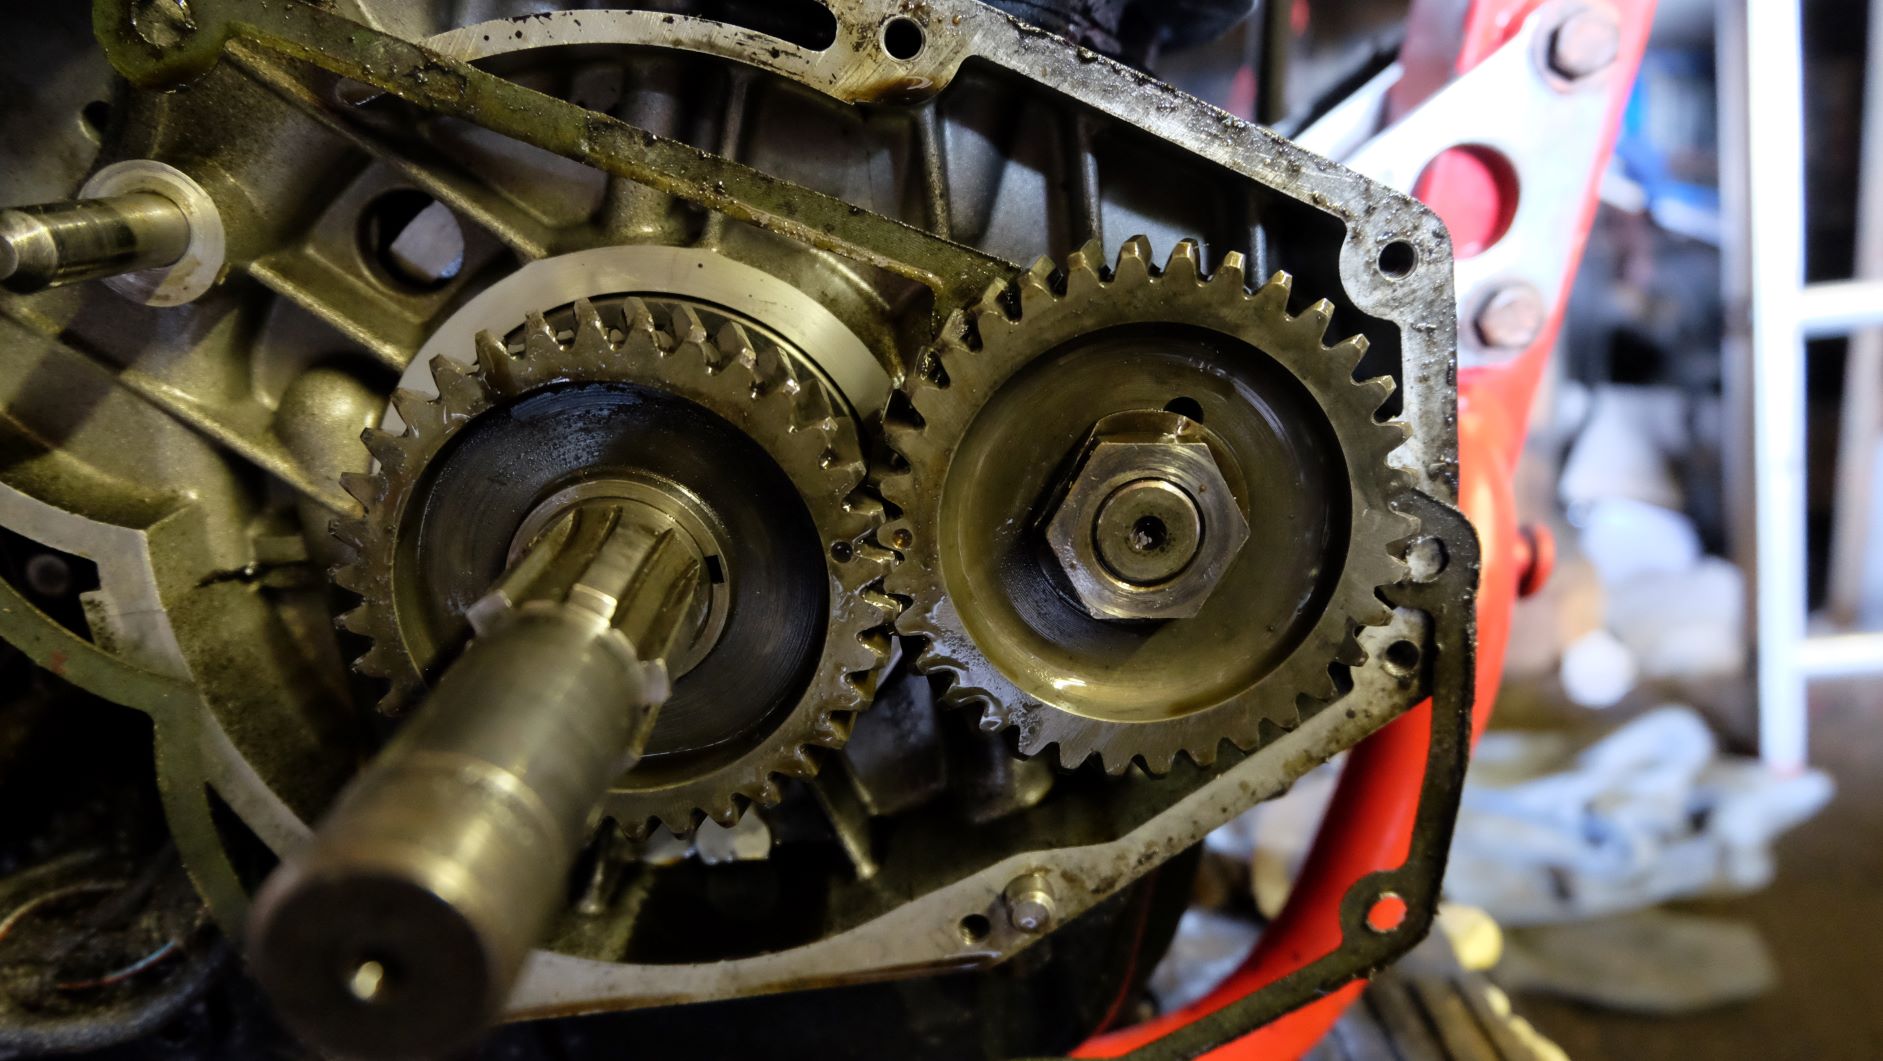
In assembling the starter side I lined up the gears and noticed they combined really smoothly. It made me think about Atlas #3 and how the gears didn’t seem to mesh so well as although the right gears they weren’t a pair. I’m resolved to install the original gears on Atlas #3 now as it was noticeable how much more smoothly the paired gears run.
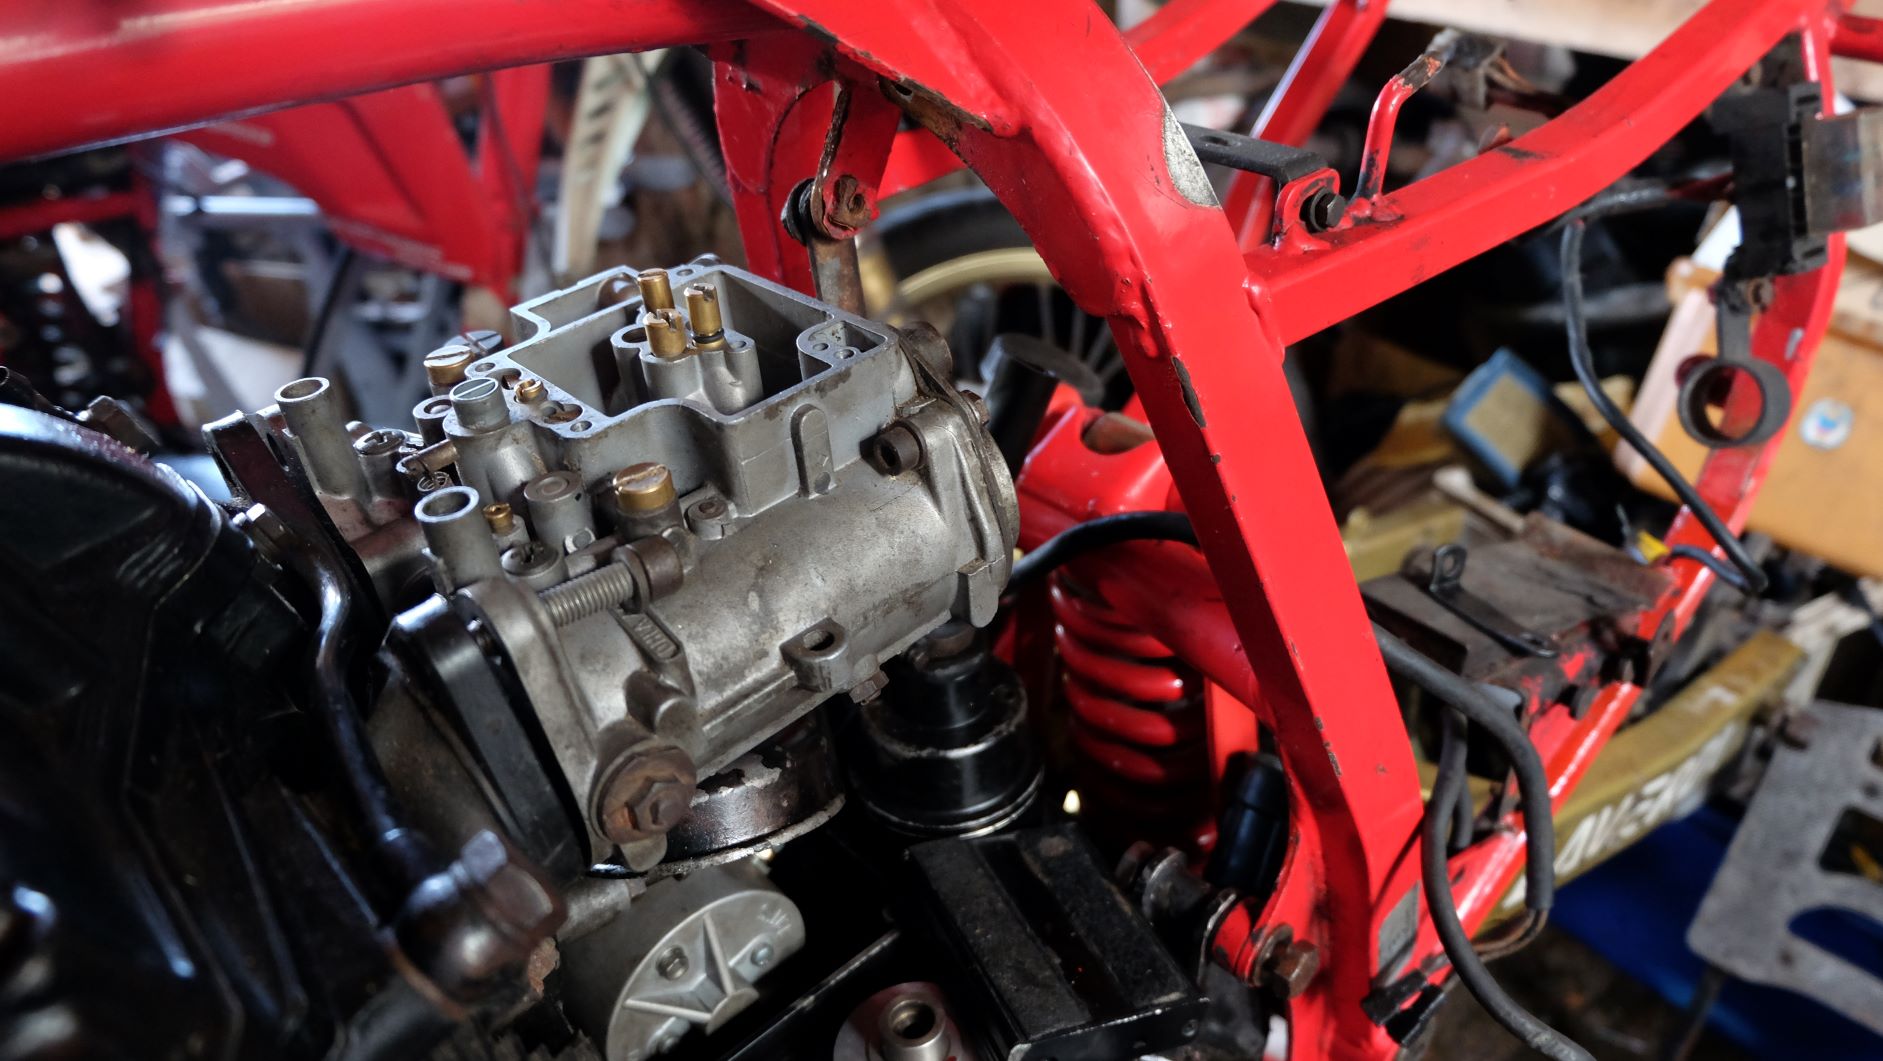
The carb’ has been offered up to take measurements as I don’t intend to refit the standard airbox. Bellmouths and foam filters are available and I’m going to go this route. The benefit of this will be more space around the shock mount which should mean I can fit an even larger (wider) battery. It’ll also make tinkering with the carb’ easier as I won’t have to fiddle with the rubber connection hoses…and finally it’ll look more ‘edgy’ which we all know is important 😉
Note bracket on downtube for twin oil coolers on a Mk 3 Atlas.
So now Atlas #1 has an engine too! The frame is stripped down and doesn’t have a swinging arm so we decided to try and just sit the engine on its side and wriggle the frame on it. It should’ve been easy but there was still a lot of oil in the motor which of course ended up on the floor! The back brake lever also got caught up in the mobile bench so the crane was bought back in to help with the job. Phew.
All the bits are in boxes and the swinging arm knuckle and swinging arm itself have been refurbished so it’s a case of getting down to fitting the parts…
Steady progress is being made on Atlas #3. The carb’ needs to be cleaned and checked over before this can be fitted. The carb’ came off an engine with a dropped valve seat which resulted in a blackened throttle butterfly. It’s pretty bad but is slowly responding to carb cleaner.
Inlet on right hand after some time cleaning – more work needed!
Alas Atlas #2 has missed the boat this time round. The engine needs serious surgery including engine welding so the engine has been put on the rack for some time in the future…maybe it’ll be sorted in a few years time….