W/E 25th May 2020

DSCF8605a

So we end this week with the project not looking that much different to before however this week has really been all about the suspension.

DSCF8595a

Having fed penetrating oil into the seized swinging arm bolt for the past week the bike was put upright and I hoped for some movement. Nothing. So the challenge was to get the bolt out but without damaging the threads on its end. Time to reflect is always useful and I wondered if the bolt thread was the same as on the front wheel spindle of a Jota/RGS (remember you use this to pop the alternator off its taper)? I was in luck so it was out with the trusty Honda VT500 wheel spindle and I threaded this so half the nut was on the frame bolt and half on the spindle thus ensuring no thread damage. You can see it needed a little persuasion but soon it tapped out 🙂

DSCF8597a

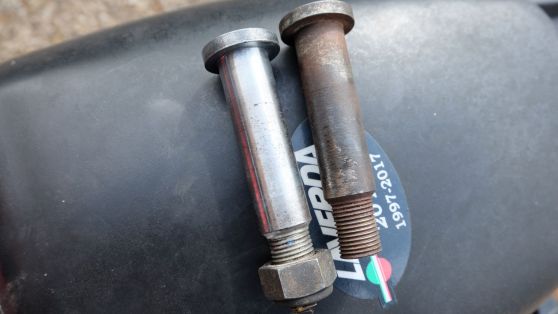
After and before (should’ve put them the other way round)

I cleaned up the bolt, working hard to get a good surface for the bearing in the swinging arm to seat on. However it began to dawn on me that the swinging arm worked in the same way as the suspension wishbone i.e. there is a bush that works on a plain metal bearing.

DSCF8602a

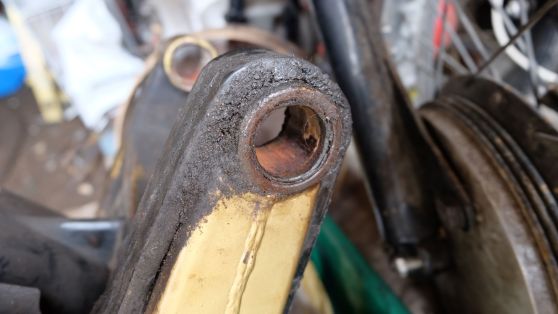
Rusted inner bush which in turn is rusted to the plain bearing

Sure enough in all the mess there is indeed a bush and bearing. What happens is that the bush seizes on the bearing which then means the bolt becomes the pivot point. If I was to buy another Atlas one thing to check is as you bounce up and down on it do the swinging arm end bolts move? If they do then the swinging arm is seized! Lucky I had spares on the shelf so next stop was to press out the old bearings.

DSCF8599a

I spent a few hours with the vice, Radio 4extra, old imperial sockets as spacers and a big hammer. I then repeated this exercise on the suspension knuckle. The tough part of this is getting the seized bush out of the plain metal bearing. Once this is done the plain bush pressed out (and in) with relative ease.

DSCF8606a

Complete suspension knuckle just needs the o ring seals

The final job was to paint the rusty swinging arm. I’m not trying to make the bikes look concours (surely not) so some Hammerite Gold was pushed in to action just to stop further deterioration.

DSCF8603a

Note chain adjustment sticker – another reason not to go for full paint job

So the suspension on the Atlas is something that requires regular maintenance – it needs to be stripped twice a year to ensure things don’t start seizing! The plain bearings are things you can buy from a bearing factor but the ‘spacer’ bushes don’t seem so easy to locate (especially the long bush in the centre hole). The other thing not to forget is the o rings as these are all that stand in the way of muck getting to the bearings. On this subject it’s worth noting that the o rings get messed up by oil (despite probably being viton) as on both bikes the swinging arm bearing on the chain side was the really seized item and in both cases the o ring between the frame and swinging arm had rotted.

DSCF8565a

Finally a a nice surprise came through the post in the form of two repaired centre stands for the RGA/S. Clem had welded in sections on all the legs where they’d whittled holes in themselves through rubbing the underside of the exhausts (funny you’d think the exhausts would come of worse hey). Clem had then moved on to the locating holes which were oval. He’d welded these up and re-drilled them and chucked in some new stainless bearings. It’s a top class bit of work and easy to underestimate how much work went in to restoring parts that are becoming expensive and difficult to find. A big thanks 🙂

Nick 🙂


W/E 3rd July 2019

DSCN0650

So as I write this folk are converging on Breganze from all over the world to celebrate 70 years of Laverda. From what I’ve read seems to be a great adventure can’t wait to hear all the tales 🙂

Back at ‘Bent Screwdrivers’ HQ work is underway for the National Road Rally. The Atlas is still not fixed so I’ve had to fall back on the Turismo. So far so good with the bike starting and running well. Even the lights work so not too much to do – oil and a new battery to hide in the tool box to run the brake light.

DSCN0646

One problem that I had to sort was knackered rubber engine mounts (yes the 120 range of triples isn’t the only rubber mounted Laverda). I’d tried to get some replacements before without success so a trip to ebay and some ATV steering bushes for under a tenner provided the solution. I had to cut them down with a hacksaw and trim the edges with nail scissors and now the engine doesn’t move sideways when I pull in the clutch.

The plan is to go for a Bronze award which means 300 miles in 20 hours. In the past the Turismo has achieved a Special Gold (540 miles) but with a family crisis still roaring my low personal reserves mean I’m going to cut myself some slack. One difference however is that unlike previous National Rallies on the 100 this time I’m using maps not a satnav. I know that nothing could possibly go wrong but just in case there is the fallback ‘Daytime Chrome’ award requiring just 125 miles that I’ve put behind my ear.

DSCN0643

I’ve also taken advantage of the hot weather and gone back to the triple frames that need painting. The RGA frame was already black but I wanted a better finish so I took it back down and reapplied the paint. The RGS frame needed another coat of priming before I apply its top coat. It would be nice to have a triple for the Scottish in September…

Nick 🙂

W/E 15th November 2015

Tony Winterton

Tony Winterton

So finally a triple engine is back together – but not without a fight!

Heat

Heat

Preparations began last weekend and resulted in some frustration as two studs that had sheared on dis-assembly refused to budge despite the application of heat and releasing fluid. The cases got sent to an engineering firm whom I’m pleased to report snapped the studs – but unlike me have the gear to sort it out and so they returned good to go, new studs courtesy of Slaters.

I say preparation began last week but clearly I wasn’t up to scratch because Tony Winterton arrived ready to help with the build and immediately declared everything ‘unclean’. I hadn’t removed the slinger plates and once these came off it revealed a nasty kind of paste in the sump – oops! So cleaning began as did the inspection of the gearbox which revealed a missing needle roller in the 5th gear sleeve. Inspection also revealed wear in the shaft and on one of the bearings so a trawl through my box of spares came up with a more robust combination.

All ready to go the crank went in (still in a box from Keith Nairn) and everything was tightened down. A tip from Scott Potter to lay the engine at 180 degrees helped to install the pistons as it is easier to push the barrels on than fight gravity with the engine in its normal position. Head on and now the challenge was to hook up the cam chain…

Hide and seek

Hide and seek

We didn’t know at the time but we were trying to put a IWIS link into a Regina chain and the IWIS simply wasn’t wide enough. Anyways after some fiddling and at close to midnight the spring clip disappeared down the engine!!! We spent 90 minutes with magnets and trying to shake the clip but with no success so retired a bit down at 1 am resolved to rise early on Sunday to recover the situation…

Die you bastard!

Die you bastard!

Sunday and 6:30 am it was back on the job and we quickly concluded we’d have to start again…cases apart and there was the clip looking a bit smug! Assembly the second time round was a lot quicker and by 10:30 we had an engine albeit with no valve clearances but then that’s for another day…

Not quite the Sunday roast Mrs A was expecting!

Not quite the Sunday roast Mrs A was expecting!

So the RGS engine is kind of built – needs detail work but the main lump is done. RGA now needs proper cleaning but having just gone through this I feel confident it’ll also but built by Christmas…

Nick 🙂

PS Yes we did use the kitchen while Mrs A was away visiting family…

W/E 1st November 2015

Triple clean up

Triple clean up

Well for the first time in ages the blog starts with some commentary on the triples! The big triple engine build off is due to happen in a couple of weeks so I have spent the weekend looking over the RGS and RGA engines to make sure everything is ready.

The RGS engine needs a couple of engine studs but more immediately it needed a damn good clean. It’s been sat covered in the same oil and road salt mix that it carried when it was lifted out of the frame over a year ago. The head and barrels have been cleaned up so now it was time to get cracking on the crankcases. I’m quite pleased with the results of a few hours with old toothbrushes and a can of paraffin. You can still see road salt damage on the front of the motor so I will have another go next weekend but it’s looking okay.

Sprag plunger and ?

Sprag plunger and ?

I found two objects in the bottom of the gearbox – the smaller item is a plunger out of the starter sprag but I’m not sure where the other ‘pin’ has come from. It looks like a needle roller but I can’t think where that would come from so I’m thinking it’s a pin. Anyway if you know what it is drop me a line.

Broken crankcase

Broken crankcase

The RGA motor is already clean but I took it off to a welder to get the top case fixed – it had a lump knocked out of it 20 years ago so now is the time to get it put right.

Broken pillion mount

Broken pillion mount

At the same time as putting the RGA case in I also put in the Atlas pillion peg mount. And aside from oiling the chain that is all I have to report on the Atlas which is running well…

Nick 🙂

W/E 9th August 2015

Big disc

Big disc

So back from holiday and back down the garage. Ended up fiddling with the front brake replacement idea that I’ve been threatening for a few months. The disc off the FZR 1000 went on fine. I hadn’t realised that the mounting plate had been shaped to fit the calipher so neatly. It does though need some fine tuning to work. The problem is that the calipher hits the spokes so the disc needs spacing out.

3 washers

3 washers

This shot shows the spacing required to prevent the calipher hitting the spokes – works out at 3 washers. I’m going to pack out all six bolts with washers and then arrange to get a spacing plate made up.

The disc that came off Atlas #2 is worn by quite a bit. I think these discs are cheap and probably have a service life of around 30,000 miles – maybe that’s good?

Staying with the Atlas I have now finalised the design of the replacement final drive sprocket. I am having the sprocket made with the spacing ‘boss’ as an integral component. The engineering firm suggested this because as the sprocket is bespoke having a separate carrier wasn’t going to get round the requirement of having a new sprocket made every time and the additional cost is negligible. I hope to have this in time for the Scottish Rally in September.

Linked to the bespoke sprocket is another idea which is to see how using a non o ring chain goes – especially for solo riding which makes up the bulk of my mileage. I’ve compared the weight of a non o ring to an o ring chain and it is noticeably lighter – that’s got to make a difference to the stress on the gearbox and those splines? The only downside is that the chain will wear quicker – but non o ring chains are about 60% of the o ring equivalent so if it gives the engine an easier time it’ll be the way to go.

All this thought is directed at trying to ensure the Atlas completes the final leg of the Three Nations Challenge in Scotland. Last year the demise of Atlas #1 resulted in a DNS when we came to a halt in Glasgow. A quick look over the bike suggests chain/sprockets. front disc and pads, front tyre and possibly wheels bearings fore and aft. I also have to fit a metal rack and get the pannier frames in place – oh and see if I can get a tankbag and the seat recovered…so not much.

Finally a small amount of progress on the triples. I’ve been procrastinating over some new engine nuts – or rather getting the older dome nuts replated. Just got a good set of second hand items so I’m fast running out of excuses.

Good to be back

Nick 🙂

W/E 11th January 2015

Smoking Atlas

Smoking Atlas

Well I think the ‘road-hardening’ process is complete! Just completed 3,000 miles and all the nuts and bolts appear to have settled down, the electrical gremlins been ironed out and it’s running good. Second oil change over the weekend and this time I’ve used straight 30 instead of 20/50. I’m not one to fuss over using special oils and had I had a tin of Morris’s 20/50 that would’ve gone in as normal but stocks were too low so straight 30 it is. I’m going to monitor the oil consumption because the Atlas does need regular top up’s and I wonder if having an oil that won’t go thinner than 30 might help out. The other benefit might be less strain on start up because the weight of the oil is thinner than 50. Let’s see.

Attention now has to move towards a triple if I am to meet my objectives. I had to order some bearings for someone else’s project so loaded up the order with all the stuff for three triples. It will all be with me next week so I can press on with getting a motor built.

Cylinder liner

Cylinder liner

I’ve also put out feelers for some replacement cylinder liners. The one in the picture is from an ’81 Jota but I am looking for RGS replacements which are something like 15mm shorter. I’d put the shorter liners (shortened by Laverda for better lubrication) in all triples including the Jota. I’m going this route as standard used pistons are easy to source so new liners might work out more cost effective. If a dealer doesn’t have stock then http://www.laystall.co.uk/ should be able to help – but don’t know costs yet.

I’ve also signed up for the ACU National Rally (http://www.nationalroadrally.co.uk/2015/index.php)  – got my lowest number yet at #46, hey that’s Rossi’s number isn’t it!

Nick 🙂

W/E 20th October

Prodigal son returned

Prodigal son returned

The Atlas is back!

Delivered via courier van from Glasgow the Atlas has returned. Unfortunately the key wasn’t in the bike so it can’t started but this hasn’t stopped me having a poke about to see if there is something in the motor I’ve missed and can fix without a complete engine swop.

Took off the alternator case and can see that the Zane sprag has some side to side play which I can shim out. It might have made the noise but then it was like this from the outset so unlikely – but worth putting right for when it does run again. I checked over the balancer shaft and this is fine, no play or loose cogs. Next weekend I will strip out the primary side but this was taken apart in Glasgow and nothing found. I really need to get the thing to go again…

So Plan A – it isn’t really broken has yet to be fully explored.

Plan B – refurbish the original engine is progressing. Word came back from the engineering firm working on the head and barrels that fresh piston rings have arrived and the bores are okay following a light hone. The head has a new inlet valve seat and refaced valves. I had to supply some fresh valve stem seals (on both inlet and exhaust for the eight valve engine) which at £6.95 + VAT and postage will add an additional bill of around £100! Interestingly the seals Slater Laverda is sending are from a Honda and need a tad of Loctite 407 to fit (OCT in Germany supply the seals [presumably not Honda] for just €4,52 each).

To add the finishing touches I need a tube of Loctite 518 to seal the crankcases, three oil seals, piston ring clamps and a fresh set of allen bolts for the cam cover and outer cases – luckily the Kempton Autojumble is this coming weekend. I’ve also repainted the crankcases with cylinder black (handpaint so not a great finish but cheap and it’ll keep the road salt at bay).

Awful hand paint job...

Awful hand paint job…

Plan C – register my imported Mk 3 is stalled while I wait for someone to come back from the Continent so I can claim it is a recent import and avoid a £5 per day import ‘fine’…

Crank in a box

Crank in a box

All the action hasn’t been solely Atlas related as the deal with the Atlas was to also send down a rebuilt crank. The above is as delivered by Keith Nairn. I had a nasty shock at the state of the crank which had been sat under the bench and looked and felt okay to me. Keith reported that he had to replace three cheeks. The centre section 4 with cam drive had spun it’s main bearing rendering the mainshaft no good, centre section 5 had damage to the crankpin and the drive side crank end had been eaten away by the connecting rod! Just shows if you don’t know what you’re looking hey – I’d considered putting it in the RGA as was!!!

I also got feedback on the rebuilt Jota crankshaft – as Keith says  ‘If a 180 crank is in phase the ground steel bar should pass easily through all three little end eyes, as you can see from the picture…..

all the rods should be vertical...

all the rods should be vertical…

Just keeping looking forward and never check just how much money you’ve spent!

Nick 🙂

W/E 5th October

A lot of cleaning going on this weekend and the final piece of dismantling which was to remove the pistons from the con-rods thus enabling the top case and crank to be parted.

Clean cases

Clean cases

The head, pistons and barrels were taken off to the local engineering firm for inspection and repair. I didn’t take the valves out of the head so I don’t know if there is any problem there. The engineer however commented that ‘something’ had been in contact with the head around the valve buckets and we concluded that this could only be the outer edges of the cam. I need to inspect the cams to see if this is the case – the steel cams would damage the alloy head rather than visa versa but if it is the cams touching then there will be some damage.

Old pistons

Old pistons

The bores look okay, no scoring or lip so fingers crossed that they can honed and a fresh set of rings used. The pistons have some minor scores but look serviceable. Once I know the state of play with the bores I can decide the next steps – obviously a rebore needs new pistons but if there is life in the bores I will compare the cost of a complete piston set against the cost of just rings. The only note of caution from the engineer was that some of the score lines looked to be slightly diagonal which could indicate a slightly bent rod!

My replacement layshaft (I’d forgotten the final drive is off the layshaft not mainshaft) is good to go, I’d forgotten it came complete with gears so it is just a straight replacement.

Look at the retaining washer groove at the end of the shaft to see the wear.

Look at the retaining washer groove at the end of the shaft to see the wear. Left hand shaft is way too wide!

While the engineer is working away he’s also going to see if he can source replacement car rings for the RGS – much cheaper. Should have his report back by Tuesday and can then get on with sourcing parts and building the motor back up. The busted Atlas may be back within the fortnight so I’m keen to have made progress on the engine before it returns.

Nick 🙂

W/E 28th September

Had to skip a week because of family stuff but back on the horse so to speak.

I’d got my RGS and RGA barrels measured for ovality. Laverda recommend no more than 0.05mm out of round – the RGA barrels passed but not so the RGS (not surprising as I’d run these with very low/no oil). The RGA barrels were honed but still have a slight mark at the top of the barrel which I’m told is okay – hmmm?

Wear mark on triple barrel - within tolerance?

Wear mark on triple barrel – within tolerance?

It would be easy to just dismiss the advice that it’s okay and get everything new but if it is good enough then if I get another 20,000 miles then it’ll be no bad thing. The engineering firm have also offered to see if they can match the Laverda piston rings with those of a car to save me money & gave me Laystall Engineering as a source of re-manufactured liners.

Along with the honed liners I also took delivery of two sets of second-hand RGS pistons. There’s enough of these around due to owners upgrading to high compression ‘Corsa’ pistons. Fair enough if that’s your bag but I never found a problem with the performance of a standard set of slugs.

as good as new...

as good as new…

So progress on the triple front and some also on the Atlas. The Atlas is still in Glasgow awaiting Keith Nairn to complete the RGS crankshaft rebuild and send this along with bike back to me. In anticipation of the bikes return I had to start work on the Atlas original motor. The mainshaft needs replacing but thinking that this engine has a good bottom end but needs a head with good valves I figured if I sorted the mainshaft I could just pop the head of the Glasgow on when it arrived. I duly set to dismantling the original motor.

Back on the bench

Back on the bench

Dismantling the motor wasn’t that complicated. The main hassle was that the pistons don’t go through the block attached to the con-rods so the crank is still attached to the top case. Other than this it all came apart easily enough.

I haven’t taken the head apart to check the valves but wonder if they are damaged after finding very worn oil ring spring in the right hand bore. Was this the cause of excessive oil in the inlet track? I also think that the balance weight on the primary side might be loose despite the nut and lock washer being in place. Rocking the balancer shaft created a knocking noise not unlike that in the Glasgow motor so I will check this before stripping that bike.

Bottom case with gearbox and balancer shaft

Bottom case with gearbox and balancer shaft

Finally to try and get back onto two wheels I have also started to see if I can recommission the VFR. Aside from the electrics which need sorting (bad earths etc) the oil cooler pipes had corroded to the point of leaking. I’d forgotten that while you can’t fault the Japanese engineering you have to remember that to make such great motorcycles as such a low price quality has to be compromised somewhere – welcome to bolts made of chocolate…On sheared bolt later and I proceeded with a liberal dose of penetrating oil and blow torch to loosen things up. Makes you respect the build quality of a Laverda even more…

Nick

W/E 27th July

Well things are moving along. The RGS and RGA frames have been welded as per the factory ‘upgrade’ – brilliant job as the picture shows. The welding doesn’t follow the factory directions precisely because my welder blended the additional plate from the headstock into the existing shuttering. He argued it was unnecessary to undo the original work by cutting some of the original work out.

Welded up RGS frame

Welded up RGS frame

Dismantled various other RGA brackets ready to take them off for shot blasting. There isn’t much bracketry on the RGA so not a lot of work. I’m also going to sand the swinging arm down manually as the bearings seem okay and shot blasting would involve a lot of masking up to save them.

Carried on cleaning the crankcases with paraffin and also went over the barrels which I failed to get down to the engine shop for measuring.

Nick 🙂